
 By Amelia © January 4, 2010
My daughter's viola case is quite nice -- there's a velour pad to cover the viola with, and the case is nicely padded and lined, and in great condition. But, it came without a strap. Now, she knows her mother well, so the request to make a strap was made knowing it might take a little while (school started in September, as usual).
It was mid-December when I pulled out my inkle loom; a week later when I got Helen Bress's Inkle Weaving
I highly recommend Helen Bress's book -- it covered everything I'd long since forgotten from the last time I'd woven on my loom, warping, color patterns, weaving, advancing the warp, and removing the weaving from the loom. Of course, her books never disappoint, and I'm pleased to know her masterpiece, The Weaving Book, is being republished soon.
I knew I needed D-rings, but I wasn't sure where to put them. A google session later, I realized perhaps a blog post was in order, once I'd sorted it out for myself.
So, once you have woven your inkle strap, here's how you make it into a detachable, adjustable strap to go on your instrument case. First off, the instrument case needs to have D-rings or loops at each end -- most do, my daughter's did.
Joanne Fabrics had the clips for the ends of the band and D-rings for making the strap adjustable. Your own local craft store may have them as well -- they were in the section with the purse handles in mine.
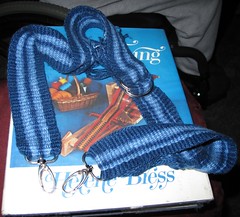
Make sure the clips will fit through the D-rings. If they do not, you'll need to alter the order you put your band together. This picture shows the test-fit and placement of the parts.
I sewed one clip at one end of the band -- folding the band through the clip's loop and sewing the end of the band onto the band on the other side of the clip's loop to hold the clip in place.
I placed the other clip's loop on the band; it's a "floater", as it needs to move when you adjust the band length. It stays in the loop formed when you make the strap adjustable -- more on that in a bit.
Then, I placed both D-rings, one atop the other facing the same direction, at the other end of the band and sewed them in, together, in place at the other end.
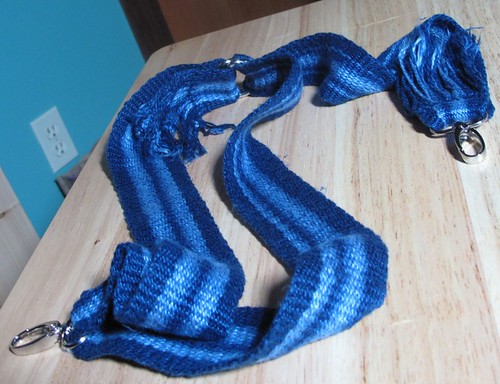
 The adjustableness is created by taking the fixed-clip end of the band and putting it up through the center of both D-rings, then around the oval end of the top one and back through the center of the lower D-ring. Keep the movable clip in the loop that this creates, moving the clip down to the end of the loop to be at the other end of your strap. Wa-la! adjustable.
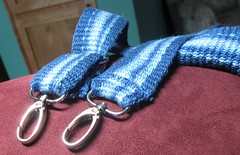
Clip your strap onto your instrument case, and adjust the length of the loop to suit your carrying style -- over-shoulder, cross-body, backpack. My daughter is pleased to be starting the new year in orchestra with her stylishly strapped case.
~~
There used to be a great website on inkle weaving -- inkleweaving.com -- but it appears to have lapsed, as now it's a Japanese fashion website. More information on inkle weaving can be found on inkle loom makers' pages such as Schacht, as well as the on-line weaving communities Weavolution.com, Weavezine.com, and others. There's also a fun flickr pool of inkle and card weaving showing looms and woven items. If you have a favorite on-line inkle resource, I'd love to hear about it in the comments - Thanks!
~~
© 4 January 2010 by Ask The Bellwether, posted at http://askthebellwether.blogspot.com/
2 comments:
I have installed large eye bolts on upright of my Lendrum spinning wheel. Then I attached an old, disused luggage strap to the eye bolts. When the wheel is folded, I can sling it over my shoulder, freeing up my hands for the several dozen other items spinners have to carry with them. For years & years, I have promised myself that I would weave a band for this wheel strap. Perhaps your viola-case strap will inspire me.
Thank you so much for breaking this down in easy to follow steps!!! My mother made a bag and the pattern directions were awful!!!!!! Thanks again!
Post a Comment