 Usually, I'm weaving scarves on the rigid heddle loom. That means I end up judging how much warp to weave into the header (for later unweaving) and how much to leave unwoven at the other end, so that there is sufficient warp leftover for fringe. Typically, for me, one end is entirely used up, and the other end gets about an inch trimmed off of it to match it up. I suppose if I took notes and measured, I could even get rid of that inch -- but my weaving stays more casual than controlled, so I've not kept a notepad handy in my weaving kit. There is a tape measure there, though.
But recently, I was inspired by a confluence of events (ahhh love those big words) to try something new. The events:
- Asked to be a pinch-hit stand-in for a last-minute guild program cancellation; topic: Velvet Weaving. Well, velvet was beyond me, but weaving I could do ... how about a rigid heddle direct-warping and weaving demo?
 Went and stood among the stash. Okay, I need to have a loom warped and a loom ready to warp, so what to use? Oooh ... the massive cone of dusty blue 6/2 cotton, and its pal, in royal blue. Okay, that's a start. But cotton? I don't need a cotton scarf.

Hmmm. I did do cotton hand towels, with that terrific Weavezine looped pile, I could do that again. Nahhh, the family has what they need right now, and the presentation needs to stay focused.
- Oh yeah ... Doni's cool fold-up-and-sew, no-cut tote! Yeah! in cotton! and wool!
- Stash diving in the wool drawer found a "matchy-matchy" blue feltable wool. Now that would be cool -- felt a wool tote, wet finish a cotton one.
Today, to return to the topic at hand, I was finishing weaving the cotton "yardage". How far did I get?

Things were getting pretty touchy as this last shuttle got closer to empty. As you can see, I've advanced the back dowel over the backbeam, and toward the heddle. There's not much room in front of the heddle -- little more than the width of the shuttle. It's possible I could fit about a half-inch more of weaving on here, advancing the warp a little more and threading the shuttle through the skimpy shed at this point.
The closer the back dowel gets to the heddle, though, the smaller and more disorganized the shed gets. Why disorganized?
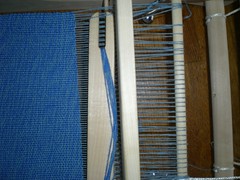
Check out this behind-the-heddle close-up.
 What you see here are the warp threads wrapping around the dowel. So, some are coming from below the dowel, and some above. The warp threads that go through the holes in the heddle are closely controlled and line up. But the warp ends in the slots end up in two different heights at this end of the weaving -- higher ones coming off the top of the dowel and lower ones coming off the bottom. Which it is, is pretty willy-nilly, since the warp is threaded through the holes after it's all wound on the back beam, conveniently obscuring which side of the dowel the threads are coming from.
You can also see that the threads aren't anywhere near the top of the heddle slots, either -- they are close to the holes. They get closer and closer as the back dowel is advanced between the back beam and the heddle, as that limits the angle they can move through.
Here's a shot from the front, so you can see it from the weaver's view. It's tricky, sliding the shuttle through that narrow gap with variable height on the upper warp threads. When the heddle is raised, it's a little easier, since the holes pull all their threads above the wonky slot warp threads.
In all, though, the last inch or two was an exercise in "not fun". So, when the shuttle was empty, I declared it done, hem-stitched it, and cut it off the loom. It's waiting on the washing machine to be run through with the Wednesday laundry before sewing it up into the first of the pair of totes.
I asked my friend S, an expert weaver of many decades, for advice on finishing and sewing. For this cotton one, she recommended washing the yardage, seaming the selvedge sides up with antique stitch rather than having a seam allowance, and then washing the sewn tote.
The amount of warp remaining was shorter than I would want for a scarf fringe, and too short to save as skein ties or any other secondary purpose. The warp leftover at the beginning was a little longer, about an inch, because I'd used a fair bit to tie bows at the tie-on rather than knots (another experiment - they held great, and came apart much easier than knots). There was probably less than a half ounce/fifteen grams total weight, from both ends. I may experiment with lashing-on next time to minimized waste at the front. Maybe I'll re-tie the wool one that way ...
~~~~
Curious about the details like heddle used, width and length on the loom? I've posted this on Weavolution as a project (named Twisted Tote) to provide that information.
For plenty of Rigid Heddle news, keep up with The Rigid Heddle on tumblr. It's a weblog linking you to all the rigid heddle sites and notes I come across online. Great fun!
~~~~
© March 9, 2010 by Ask The Bellwether, posted at http://askthebellwether.com/blog

