Showing posts sorted by date for query sock yarn. Sort by relevance Show all posts

Spinner's Alphabet: What begins with T? Twist Angle!

By Amelia © November 9, 2026

T
is for Twist Angle. This is my favorite yarn measure; combined with wraps per inch it tells me so much about my yarn. On its own, it gives me a feel for the amount of twist - no matter how thick, a 25° angle of twist in your plied yarn tells you it is a medium knitting yarn. Super-squishy soft yarn has about a 15° angle of twist, and superb sock yarn measures in at a 38° twist angle. All of this holds true no matter how thick or thin the yarn is - 25° is a medium knitting yarn by feel, be it laceweight, DK weight, or aran. All will be moderately squishy. 38° will feel durable no matter the thickness as well.

There are plenty of twist-angle devices on the market, but I do tend to use a protractor - there's an app for that, though I enjoy one from my kids' fourth grade materials - they are now full grown adults, so it brings back fond memories.

I measure by lining my yarn up along the 0° mark or the long straight edge of the protractor, and then keeping it parallel to that, I slide it over the angle markings. One direction of a twist angle tool, or one side of a protractor, will match the angle of twist of your yarn - one side is for Z (clockwise) twist and the other for S (anti-clockwise) twist. I do usually measure plied yarn, as it's easy to see the angle the singles twist around one another. I slide over the lines until one matches the angle of twist in the yarn. That's its twist angle. In the image above, it's the lower numbers that you use. Given it only has markings every 10 degrees, it's hard to be exact. I like having markings every 5 degrees, so I can see if I'm in sock yarn range in particular with its 35-38° angle of twist.

My other favorite gauge is also free - the Memphis Fiber Arts website had it, and luckily we can still access it though the internet archive: Twist and Grist - a Spinning Gauge. It has both twist angle measurement and WPI measurement, though I do prefer wrapping my yarn around a pencil to measure WPI, rather than matching the thickness of a line with one strand of my handspun. I've put an intentionally blurred one here so you get a hint of what it is, but do click through - it's a lovely tool you can print and use.

Do you use twist angle or twists per inch? My treadle-counting friends measure twists per inch, but my spindle and e-spinner friends are more likely to use twist angle.

I'm curious to know if you have another spinner's T to suggest.

~~~~
© November 9, 2026 by Ask The Bellwether, posted at http://askthebellwether.com/

Spinner's Alphabet: What begins with O? Overplied!

By Amelia © August 24, 2026

O

is for overplied yarn. I usually overply my yarn when I'm spinning for socks, and then rough finish it, which lightly felts the strands so that it will behave like balanced yarn in the knitting. It's doubly durable from the active surface twist and the light felting.

Another situation that calls for overplying is when you are constructing a more-than-two-step yarn such as a cable. Here's a recipe for making a cabled yarn:

  1. Divide your fiber into 4 equal parts
  2. Spin each part into Z twist singles on its own bobbin. You get to decide how much twist you want - ply it back on itself and if you like it, use that amount throughout. So you can have a puffy 2-ply or a tight 2-ply (that's coming next).
  3. Ply two bobbins together with S twist into a balanced 2-ply yarn. If at all possible, do this step, let the yarn rest, then move on to the next step. Lots of folks (myself included) don't do that - we do both steps in one pass. I want to experiment more with separating the steps, letting this balanced 2-ply sit on the bobbin for a while to rest so it acts balanced - i.e. the plying twist becomes effectively as dormant as the singles twist became before plying happened. You now have 2 bobbins of 2-ply.
  4. Overply the 2 bobbins, i.e. add more plying (S) twist. How much? So that the ply-back looks like grains of rice / strings of pearls. This is most obvious with 4 different colors in play, so that's a good learning tactic, frankly. I'd note most of my singles tend to be fairly strong twist as I'm doing this for socks, so my ply-back is also fairly strong feeling. I usually overply until the yarn compresses down to look like a single strand again, i.e. not much visible curving of the two strands around each other. It's a good idea to let these bobbins rest a few days so that extra twist can go dormant and not drive you crazy when you do the next step... just saying...
  5. cable sample
    Now cable-ply: take the 2 bobbins and ply them on each other in the Z direction until they are balanced. What's balanced? so they match the ply-backs you made in the previous step. That grains-of-rice look.

Whew! If it all works out the final skein washes up balanced. To be frank, it is a strong twist typically. If you met the grains of rice look but it's acting over- or under-plied after wet finishing, rough finish it by lightly fulling the yarn. I hope that's R! If not, see this post: When do you set the twist?. That will lock it all in place and make it act balanced.

A note on direction - the usual final twist direction of commercial yarns is S. If you want that, then spin the singles S, ply Z, and cable-ply S. There you go, final twist direction S. I will note, spinning singles S feels odd, as our hands get so used to feeling that Z spiral as they draft. Stick with it, and S singles will feel natural as well.

The great part of making a 3-ply sock yarn is that a cable from the leftover singles will have the same final diameter as the 3-ply yarn due to the extra compression it has. Great for heels and toes! A lovely friend told me that one day and it has proven itself true at my wheel as well.

Other fun O's: Optim (stretched merino, so soft!), Opposing Ply (another great yarn structure!), Ombre (shifting from one color to another over a long distance/in a single skein).

What's your spinning O? Have you overplied on purpose? Let me know in the comments.

See the whole spinner's alphabet series.

~~~~
© August 24, 2026 by Ask The Bellwether, posted at http://askthebellwether.com/

Spinner's Alphabet: What begins with L? Llama!

By Amelia © July 13, 2026

is for Llama. That super fun, often mislabeled fiber. No, it's not just coarser than alpaca, it's also softer. Depends on the llama! My Mahogany, pictured here, had 18 micron fiber as an adult. Bolivian Llama is by far the nicest breed for fiber. And so many natural colors!

Llama, like alpaca, is a bit more slippery than wool as it has less scale on the surface. So I focus on making very solid joins with at least a staple length of fiber left when I add new fiber, ensuring old and new are drafted together. That said, llama can felt! I made some 100% llama socks and they were unfortunately put in the dryer - not by me! So do take care.

I love putting llama in a sock blend, in fact, as it can have a nice staple length and nice llama, like my Mahogany, can add softness as well. My favorite llama blend was Mahogany and Marge, a Shetland sheep with a moorit fleece. Their two colors went well together leading to a rich roving that was a pleasure to spin!

Llama was the fiber I turned to when I started trying to spin laceweight. It was lovely for that, so easy to draft. I was still early in my spinning career, so though I did knit lace with it, as seen in the image, it was not quite laceweight in thickness. Now that I am more skilled, I do still love spinning llama laceweight. I still have a bit of Mahogany's fleece in my stash, and I love combing it to have a perfect smooth prep for spinning fine.

Other fun L's: laceweight, the goal of so many spinners that Shetland Lace Ring Shawl, with yarn so fine the shawl can be drawn through a ring; luster, the natural sheen in mohair, longwools, silk, and viscose fibers (tencel, rayon, etc.)

What has been your experience with llama?

Do you have another spinning L?

See the whole spinner's alphabet series.

~~~~
© July 13, 2026 by Ask The Bellwether, posted at http://askthebellwether.com/

Spinner's Alphabet: What begins With G? Grist!

By Amelia © May 4, 2026

G
is for Grist. That should be a four-letter word, given how much practice it takes to spin to a target grist. It's the measure of a yarn typically in yards per pound (YPP) or meters per kilo. Things that impact Grist: Wraps Per Inch, Twist Angle, Drafting Style, Fiber, Finishing.

In color classes I often talk about "spinning to the grist" - getting the same yardage with the same weight of fiber. If you have ever had this happen, I hope you went and bought a lottery ticket, or celebrated in some way.

My most recent run-in with grist is attempting to use a McMorran Yarn Balance to estimate YPP of handspun. I do not recommend that, by the way - it has not proven reliable with my human-spun skeins. So, I put my handspun on my skeiner and then count the rounds, or run the whole skein through my yardage meter between swift and ballwinder.

The one YPP number I keep in my head is 1600 - the typical yardage for socks. With their tight twist angle of 35-40°, drafting style is less important. I aim for sock fiber to produce 100 yards per ounce, or 400 yards for a pair of socks. I've seen that number again and again no matter the blend.

For the same yardage and WPI, I can use weight to compare twist angle. Higher twist is denser, so I know if my 400 yards of 16 wraps per inch sock yarn is less than four ounces, I'm going to have socks that will wear out faster than 400 yards of the same WPI that weigh four or even five ounces. In fact, the five ounce skein would be super tough and have a pretty high twist angle.

I can also take a comparative guess at drafting style or fiber preparation with the same weight and WPI. The skein with more yardage is likely to have some woolen component, while the skein with less yardage is likely to have some worsted component. Worsted prep/draft lead to denser yarns, causing the same yardage to weight more than a skein with woolen prep and/or draft.

It amazes me how, even after spinning for decades, I still come up with ideas for experiments to hone my spinning knowledge. There's always something new to explore, be it tools, fibers, or the intricacies of spinning itself.

Other fun G's: garnetting (cutting yarn up and recarding it to make new yarns). This is how we get the recycled blue jean fiber that I love to blend with cotton.

Two questions:

  • Have you had the magic of spinning to the grist happen? Even within an arm's length is "close enough"!
  • What's your spinning G?

See the whole spinner's alphabet series.

~~~~
© May 4, 2026 by Ask The Bellwether, posted at http://askthebellwether.com/

Spinner's Alphabet: What begins with F? Fiber Artist!

By Amelia © April 20, 2026

F

is for Fiber Artist. When people call me a fiber artist, it makes me a bit uncomfortable. I don’t instinctively feel like an artist. I tend to think of myself as an artisan. I’m drawn to the craft itself — the methods, the repeatability, the satisfaction of using tools and technique to reliably achieve a specific result.

I suppose this goes back to my background as an engineer, where the goal is to design a process and then execute it well. We use our tools to get results, and there’s something deeply satisfying about refining that process until it behaves the way we want it to.

Over the years, I’ve seen that fiber artists come in many stripes and colors, and that the label can apply to me too. There are fiber artists who focus primarily on the art of what they do. They create unique pieces, rarely the same item twice, because they’re working to embody an idea or concept.

My own path has been different. As an artisan, my focus for many years was sock yarn. That was a ten-year journey. I embraced the idea that I could refine my process until I could reliably produce the sock yarn I wanted, while still exploring different variations within that framework.

Another aspect of my skills is analytical. I’ll encounter a commercial yarn, love its feel, and then work to copy it. Often I end up improving on it, because I can choose the breed of wool, the fiber content, and the structure. I can make deliberate decisions that shape the final result. I don’t see that as plagiarism or copying. I see it as using my skills to reach an intended target. It’s part of the craft — understanding something deeply enough to recreate it, and then making it my own through the choices I make along the way. This harkens back to my background as an engineer, where what we are doing is working to get results, and we use our tools to get those results.

I embrace the art and craft of spinning and am happy to be recognized as an artisan, teacher, writer, and yes, even artist in this space. I'm excited to see where the next decade takes my spinning — cotton, perhaps, as my looms call to me for new projects.

I had originally considered having F stand for fiber, since that is the heart of what I do as a fiber artist, and then building you a beautiful taxonomy of everything fiber, the animal, plant, and manmade fibers, and all the subcategories below them. There's just so many!

Other fun F's: Finishing (so important when spinning yarn!), Felting (see Rough Finishing...), Fiber Festival (aka Wool Show)

I would love to hear about your fiber artist journey and about the fibers that you love to spin.

What's your spinner's F?

See the whole spinner's alphabet series.

~~~~
© April 20, 2026 by Ask The Bellwether, posted at http://askthebellwether.com/

How much ply twist is "balanced"?

By Amelia © March 30, 2026
skeins of yarn

Typically we tell new spinners to seek balance in their plied yarn ... see How Much Twist do I Need When I Ply? for that advice. If you let singles rest, the twist in the single is still there, but dormant. Don't wake it up before plying! Instead, keep a fresh ply-back from when the singles were spun to guide plying twist and realize that the dormant twist will show up when you wet-finish your skein after plying.

However, I would really like more specific advice. Some authors talk about counting treadles - clearly not spindle spinners!

What follows is from an old Ravelry post of mine:

"Mabel Ross’s theory, in Essentials of Yarn Design, is that ply twist is 2/3 singles’ twist. So, your final yarn has 8 TPI [twists per inch] in the 2-ply and each single has 4 TPI remaining in it. But why would two, skinnier, 4 TPI singles “balance” with an 8 TPI 2-ply? I know, 4 + 4 = 8, but does that hold true here, isn’t it more like 4 and 4 in parallel, not in series, pulling against 8? Clearly I’m thinking about this too hard, muddying my ability to understand what I’ve always taken as fact in my desire to get at its underpinnings.

"Alden Amos’s theory, in The Alden Amos Big Book of Handspinning, states that ply twist is 1/2 singles’ twist. I read that 10 times last night trying to figure out what he meant. Does he mean, once it’s plied, that your 2.5 TPI 2-ply has singles that each still contain 5 TPI? or that your 2.5 TPI 2-ply has singles that when not plied were 5 TPI? And do either of those things match up to Mabel Ross’s statements?

"Anne Fields (Spinning Wool: Beyond the Basics) quotes Mabel Ross, so she’s taking her numbers as a given. And Peter Teal (Wool Combing and Spinning, the original version) doesn’t really discuss balanced yarn, since he wants to be aware of what the twist is in his singles, and he wants there to be a certain amount, so he discusses plying twist in those terms."

End of quote

Well, that didn't really help. Especially the TPI of the single after plying - I want to know how much twist to put in the single and then how much twist I put in the ply.

These days, I do still use the freshly spun ply-back sample as a sample to match to when plying. And rather than TPI, I use twist angle to let me know what type of yarn I'm spinning. Medium knitting yarn wants a 25° angle of twist while durable sock yarn wants a 35-38° angle of twist. This is true no matter what my yarn diameter (WPI, wraps per inch) is.

If I don't have a sample, I can make one by folding a length in half and knotting the ends, being careful not to let any twist come out. Put it in warm water and the dormant twist wriggles the sample up to show what balance is in the 2-ply.

If I have no access to warm water, I can visually inspect the plying. When balanced, the fibers in the singles area straight, and the plied yarn is at maximum diameter. Before it's balanced, the singles are compressed and after the balance point, the plied yarn compresses.

You can find many posts on this blog about balance in plying if you'd like to dive into the topic further.

I may never get to the bottom of the singles-vs-plied twist question - but perhaps someone else will rig up an Alden Amos-style twist counter and then we'll all know. Will it be you?

~~~~
© March 30, 2026 by Ask The Bellwether, posted at http://askthebellwether.com/

S.T.A.B.L.E.R.

By Amelia © August 16, 2019

Every specialty has its own vocabulary, but a word shared by many is "stable". It's an acronym:

"Stash Beyond Life Expectancy"

I knew I was STABLE with my fiber stash, but I'm a newly empty-nester and looking at spending part of the year in an RV to have some fun before my grandparent years (no hurry, kids!) The US has so much natural beauty to enjoy and I've not had much opportunity since family camping trips as a child - Camping as a parent is work, so thanks, mom &dad!

This upcoming long journey has me planning out what to take and revisiting my "stable" of fibers and yarns. In so doing, I found that I was not only stable, but likely STABLER - I had Stash Beyond Life Expectancy and Reincarnation! If skeins were horses, with my stash, beggars would ride (to borrow a pre-automobile metaphor).


The pre-sale stash (well, a corner of it...)

I cut my stash in half right away with a stash-busting and extra-tool-busting studio sale in my studio and on Facebook and Ravelry; my friends near and far helped with the redistribution and well-wishes for my journey - I may even have added a few stops as we circle the US, so look for some meet-ups along the way or let me know when your group meets and I will try to drop in when I'm near.

It took a hard dose of realism, and Netflix providing the Marie Kondo series, to get me to admit I had too much of both fiber and tools. It's been a blast rehoming fiber and tools - so much fun to see friends and make new ones as they found special treasures and spindles they've been wanting, and the messages of how I got them started with my book, Productive Spindling (available online from Bosworth Spindles while I am away from my own copies) or classes they took (and yes, I am still teaching! Happy to do a group or private lesson while I'm on the road if we can merge timeframe and location :-))

But I digress. Half my stash was still STABLE. I did some back-of-the-napkin math on how much stash I'd need for the trip. If I did a fair bit (okay, a lot) of spinning, cranking, knitting, crocheting, nalbinding, and weaving, I might have the following "output":

  • 2 pairs of socks/week on the sock machine
  • 1 scarf or tote a week on the rigid heddle
  • 1 crochet/knit/nalbound had per week on the hook or needles
  • 4 oz. cotton/week on the charka
  • 4 oz wool/week on the wheel or spindle

Now, that's likely at least double the output I'd be likely to produce since I plan to be hiking and exploring as well - and I'm bringing a ukulele so there should be some play time as well! But it's still a starting point, so let's work this through. If I assume a 40 week journey (it could be!) and 4 oz. per scarf/hat/socks, that works out to 60 pounds of fiber. So I started out with that all lined up in the hallway and the reality that it was too much, sunk in fairly quickly.

But there is a bit of a rethink I do need to do - the handspun will feed into the crochet, weaving, and cranking, so if I spin for a week and then use that fiber the next week, and don't overload myself, then I would have a fortnightly (that's 2 weeks) plan of:

  • 4 oz wool, spin then weave/crochet/crank
  • 4 oz cotton, spin then weave/crochet
  • 4 oz yarn to crank, weave or crochet (or nalbind!)

That feels more do-able, 8 ounces of spinning every 2 weeks and some commercial yarn so I don't feel pressured to spin everything. But to be completely honest with myself (and you!) even that may be overreaching, if I get distracted by sight-seeing, ukuleles, or writing ... but it feels right as a starting place.

So what does that reduce my number to? 12 oz times 20 fortnights = 15 pounds. Heck, that's very doable in the RV - my clothes probably weigh more!


The "finalists" in the trip-fiber selection.

When I did mail order and wool shows, I had a lady who showed up at Black Sheep Gathering each year to buy her wool for the year - so it is possible to avoid stable (and even lots of stash). I'm hoping my reset and time on the road will give me a different perspective on fiber acquisition and use.

The fiber going with me fits in this nice large (waterproof!) tub, which can ride on the back of the RV on the rack:


The tub, filled to capacity with fiber & yarn.

I'd be interested to hear if you are a "stasher" or have a more just-in-time fiber acquisition policy - let me know in the comments!

Thanks,
Amelia.

~~~~
© August 16, 2019 by Ask The Bellwether, posted at http://askthebellwether.com/

How do you get 4 oz. of fiber onto one spindle?

By Amelia © May 17, 2015 The New Spindle

Hi! I've a new job that is generally keeping me quite busy, but I still get to think about and touch fiber every day in my studio, so no complaints, and the steady paycheck makes up for not having an 'all fiber, all the time' life any longer!

An interesting question came across "Ask The Bellwether"'s comment feed the other day: "What I need to know and I hope you can help me, is: if you are spinning 4 oz of fiber and plying on the fly with your spindle, how do you get all 4 oz of the fiber on the spindle?"

Here, dear readers, is the answer I have to this:

To get four ounces of fiber on a spindle, there are several considerations:

  • First you want to be spinning a thickness of fiber that can support the 4-6 ounce weight of spindle-plus-fiber; so you aren't going to be spinning laceweight and doing this, as it just won't support the mass. I would aim for a single that is about sockweight for this, if you truly want your 4 ounce goal.
  • Second, you need to have a spindle that can store that amount of fiber on it. How do you know? Well, if it's top whorl, you will want a fairly wide whorl, say 3" across if you can get it, at least 2" across; and a longish shaft. That's because you are going to be storing all that yarn on the shaft under the whorl, and the cop (the wound yarn on the spindle) has to be no wider across than the whorl, or you run into other issues. If it's a bottom whorl, the long shaft is still necessary, but the whorl size isn't as important. For a Turkish spindle, you need long spindle arms so they poke out from the ball (unlike this little Turkish whose arms end inside the yarn ball).Stuffed Turkish spindle
  • Third, as you wind the cop onto the spindle, you need to keep it balanced. The spindle will get all wobbly and not fun to spin if the cop is not balanced, making you want to end the project right away.

If I were to work on this as a goal, I would start with a spindle that was about an ounce in weight, with a wide whorl or long arms, and a shaft length of at least 9-10 inches. In fact, I do have a ply-on-the-fly project going right now on just such a spindle, but I am going to split it into two 2-ounce balls, as the singles are fairly fine so that the 3-ply can be sock-to-DK weight yarn (about 14-16 wraps per inch).

I don't think that we have to get a whole braid of fiber onto a spindle to be successful; there are plenty of uses of fiber that tolerate breaks in the yarn. With knitting or crochet, Russian Joins or even other clever knitting joins are out there for making this feasible, and weaving and needlepoint are even more tolerant of breaks, expecting them in due course.

See related topics:

How much yarn can I spin on my spindle?
How can I combine two full spindles?
How can I get more yarn on my spindle?
When is the spindle full?
How much yarn can you wind onto a Turkish spindle?

~~~~
© May 17, 2015 by Ask The Bellwether, posted at http://askthebellwether.com/

What is your knitting nemesis?

By Amelia © December 1, 2013, AskTheBellwether.com

Seed stitch has always been a challenge for me to knit. So much so, I sweet-talked my mother into knitting a booth sample sock for me because the leg was all in ... Seed stitch! Ouch! I learned that my mother didn't enjoy seed stitch, either.

But somewhere along the way, my hands have apparently made their peace with the yarn-to-the-front-and-purl, yarn-to-the-back-and-knit pattern that is seed stitch.

It all started with a little class on speed knitting from Stephanie Pearl-McPhee at Madrona a few years ago. She taught us lever knitting,where one needle is stationary, the other does the work, and you minimize the distance yarn has to move. Very efficient.

One of my take-aways from the class is that the yarn is basically making the same motion all the time, which I can simplify down to a flick of my index finger when it is tensioned correctly. The second key take-away for me was that I can often combine movements: take the old stitch off the left needle while at the same time, bringing the yarn to the front to be ready for the next stitch, a purl; or bring it to the back while removing the old stitch if the next stitch is a knit. That made seed stitch as many beats as stockinette, rather than the doubling it used to be for me due to separating that yarn-to-front, yarn-to-back motion from the others while knitting.

When we learn a new skill, often it's about breaking down actions into individual steps so we can understand what is going on and have more control over the process. But mastering a skill can be about figuring out how to combine separate actions into one fluid motion to be more efficient.

Take a look at your next seed stitch project, or K1P1 ribbing, and see if you already have the combined motion down, or if your knitting can be helped by that like mine was.

My little project-in-process here is Steampunk Washcloth (based on http://zombiesknittingandtimewellwasted.blogspot.com/2013/01/steampunk-handkerchief.html) from charka-spun Peruvian mauve cotton. I picked this pattern due to the edging: less than perfect handspun tends to have wriggly edges, so by having a little edging on the work, I can even out that roughness. Worked like a charm!

 ~~~~
© December 1, 2013 by Ask The Bellwether, posted at http://askthebellwether.com/

How do you tie a skein?

© November 14, 2013 by Amelia of Ask The Bellwether

A post on tieing skeins, really? Yes, really. As a spinner, this is something I do a lot. Every time I have a full spindle or bobbin of yarn ready to be finished (with a gentle wash, usually), I have to skein it up.

That skein has a lifespan with chapters: first, it needs a wash. After washing, it is reskeined for storage. It might then be reskeined in preparation for the county fair or dyeing.

In this video, I show the skeining of the spindle-spun singles that are destined for the county fair:

Here are some skein facts for you:

  • For two ounces or more, I wind 2-yard skeins. For less, I usually wind an arm skein (like winding an extension cord, around your arm).
  • I will tie most 2-yard skeins, sock-weight or thicker, in 4 places. Skeiners such as the one in the video, and niddy-noddies, conveniently wind skeins with 4 posts in the skein. So it's easy to decide where to tie it.
  • For finer yarned 2-yard skeins, I will put 6-8 ties in. the last thing I want is for the skein to get disorganized in the sink.
  • For arm-skeins, I use 3 ties for most yarns, 4-5 ties for finer yarns.

As shown in the video, the first skein winding, of to-be-washed yarn, uses self-ties. The inner end, at the start of the skein, is self-tied around the skein: wrap the end around the skein and tie it to itself the way you tie a shoe or a ribbon before making a bow; not pulled tight, not loose, just so the yarn wrap rests on the surface of the yarn it goes around. The outer end is then taken and unwrapped as far around as it needs to be, including pulling it out from under the first tie, to put ties on the other three sides (the extra lace weight ties I will add after with cotton string). For those three sides, the first two ties are simple half-hitches around the skein, snugged up to the surface of the skein but not pulled tight. On the final side, the end of the skein is self-tied.

Why so precise? To be efficient, actually. I am going to have to rewind the skein to make it tidy and separate any clingy strands. Experience has taught me that it is easier to rewind a skein if I start from what was the outside the first time I wound it ... basically, reverse the winding. that's because strands collapse in and disturb the inner wraps as you wind a skein.

Starting with the inside end, strands tend to be more likely to tangle and be difficult to separate. Starting at the outside, I am pulling off the strands in reverse order. To be extreme, it's a bit like unstacking a cord of wood, where do you start? At the top, taking wood off in the reverse order you put it on the stack (more or less, since the pieces aren't strung together like the fiber in your yarn is). I don't know anyone who unstacks woodpiles from the bottom.

And, with how I have tied the skein, I can easily tell which end is the outside end: the one that makes three ties.

And and: The inner tie only has to undo a short length, so it won't get discombobulated or be in the way as I rewind. I can tuck that short end back under the skein.

The longer end is the end I wind from. Very obvious which one to use, and I have a nice long run to run between my swift (holding the skein) and my skeiner, which I wind the skein onto.

Whew! So, how do I tie the reskeined skein? For storage, I will grab the nearest cotton string and put on 4 ties (or more, for fine yarns, or fewer for small skeins). For those, I usually use the "classic" figure-8 tie as described by Spin-Off Magazine. Here's the picture from my book Productive Spindling showing a 3-tied arm-skein:

Notice that I have not used the skein yarn itself in these ties. The ends lie flat within the yarn of the skein.

When the skein is prepared for the county fair, I will cut lengths from the skein itself, or if it is very precious, find an inobtrusive yarn in my stash of similar color and the same thickness or finer. These lengths are used to replace the cotton ties when the skein is retied for the fair.

When the skein is prepared for dyeing, I use very obvious ties in a material that won't take up the dye: white or cream acrylic, usually. I may put on a few extra ties for dyeing, as I need them to be loose enough for water and dye to make it through the tied area. Those pale acrylic ties are easy to spot in the dyepot, allowing me to lift out the skein without turning it into a pot of spaghetti yarn.

The style of tie on my skein tells me what its status is, another benefit to my thoroughly thought-out skein-tyeing philosophy.

That is how I tie a skein. How about you?


© November 14, 2013 by Amelia of Ask The Bellwether, posted at http://askthebellwether.blogspot.com/

How do I spin for a sweater?

By Amelia © November 1, 2013

A ravelry member contacted me recently: she had the perfect sweater pattern, and wants to spin the yarn for it. Her question was: How do you make sure your handspun yarn will work, and that you have enough?

To spin yarn to substitute for a commercial yarn, there are several things to measure: fiber, yarn thickness, yarn construction, and amount of twist. Most of them lead you back to grist.

Ahh, grist. I didn't get what grist was about as a "young" spinner. It wasn't until I started spinning tapestry yarn on commission that I realized how important grist was.

Grist is a measure of yarn density, relative to yarn thickness. It is measured by yards-per-pound. It's a bit of a tricky duck -- I can have two yarns with different thicknesses and the same grist. The thicker yarn has more air in it, or a less dense fiber. How can fibers have different density? Easily. Angora fiber, for example, has a hollow core. So it has a definite lightness to it. Alpaca fiber is quite dense, so it drapes really well,  almost flowing over whatever it is placed on -- its own weight pushes it down. That's part of why alpaca sweaters "grow".

First, if the pattern lists a commercial yarn, then look at the fiber content of that yarn. If it's acrylic, medium to fine wools should spin up with a similar grist. If it's a wool/alpaca blend, then start there, with wool and alpaca. Then, look at the yards in a ball of the yarn relative to the skein's weight. If it's 400 yards in 8 ounces, then multiply by two to get the yards in a pound: 800 yards in 16 ounces. So, that yarn would be 800 yards per pound (ypp).

So, choose a fiber similar to the fiber in the commercial yarn. This is so you have less issue spinning to match both the thickness of the yarn and its grist. It's important to match yarn thickness so you can match the gauge it calls for -- if you don't match both stitch and row gauge, the shaping in the pattern as written won't work. That would mean figuring out how to redo the shaping.

Then, see if you can find out the yarn construction of the commercial yarn. 2-ply? 4-ply? a 6-ply cable yarn?  The yarn construction tells you a bit about the roundness of the yarn, as well as its toughness. As a straight plied yarn (not cabled), the more plies there are, the rounder the yarn is. A single, though, is the roundest yarn (obviously...). If the yarn is 3 or more plies, I will usually spin a 3-ply yarn and call it good enough. I only spin a 2-ply when matching a commercial yarn if it, too, was a 2-ply. That's because 2-ply yarns knit into a flatter fabric -- my row gauge is likely to be off if I use a 2-ply in a pattern that calls for a 4-ply yarn. I spin a single when the commercial yarn was a single, or one of the faux-singles which are actually an odd 2-ply with the same direction in the singles and the ply.  

Cabled  yarns are very strong. Usually, a commercial cabled yarn is cabled due to the fineness of the fibers -- many thicker cotton yarns are cabled yarns. Some sock yarns are cabled for strength. If I'm just not up for spinning a cable, I will add strength to the yarn by  spinning with a high twist. Cabling also compresses down the yarn quite a  bit, so I will also pick a denser fiber if I  am choosing not to cable the yarn.

Many commercial yarns just say "wool", without providing a breed. And different breeds will have  different densities in yarn. From more  dense to left, we have longwool,  medium wool, and fine wool. There are some outliers -- high crimp down breeds are less dense than other medium wools, as their high crimp keeps a lot of room in the yarn for air; and Shetland, a fine wool, has less crimp than other fine wools, so spins into a denser yarn. It will be up to you, to decide what to use. If you can feel the commercial yarn, you can decide what class of wool might work best. Or, you might be spinning the yarn because you need to use merino for softness or want to use a superwash so it will be washable.

When yarns provide percentages for fiber content, those are by weight -- so a 60/40 wool/alpaca yarn is 60% wool by weight. That means when you blend fibers to match the yarn's  content, you would weigh out 6 ounces of wool for every 4 ounces of alpaca.

Finally, you need some idea of the thickness of the yarn. If you have a sample, you can measure the wraps per inch (here's how: http://blog.knitpicks.com/wpblog/measuring-wraps-per-inch/ ). You can use the Craft Yarn Council of America's standard yarn sizes to determine what wraps per inch range should work, as shown on that link. Or you may find WPI information about the yarn on ravelry.com's yarn database. 

The last piece of information is the amount of twist in the final yarn, and any information about finishing that might be discernable. There is no general inclusion of twist information on the yarn ball band. However, pictures will give you a general idea of low twist or high twist. Low twist yarns tend to look  puffy in the ply; high twist yarns look shiny due to the smoothness the high twist puts on the surface of the yarn and how compressed the singles are in the ply structure. The item itself may give an idea about twist amount: socks are best knit with durable yarns, which typically have high twist. Sweaters with cables need fairly crisp yarns, so a moderate to moderate-high twist might be appropriate.

So, you have your blend, you have your yarn construction, your grist, your twist, and your thickness. Next: sampling. That's right, you need to spin some and measure it. 

The first sampling hurdle is determining singles' size to get the desired plied yarn thickness. The general guideline I use is that, with moderate twist, a 3-ply uses singles that are half the final wraps per inch; and a 2-ply uses singles that are 2/3 the final wraps per inch. I start there, and adjust the singles as needed to get the plied wraps per inch that I need. I have some tips on sizing singles for plying here:  http://askthebellwether.blogspot.com/2007/08/how-fine-do-i-spin-my-singles-to-get.html

If you are having trouble getting yarn thick enough, you'll either need to spin thicker singles, or add more singles to the ply. If you are having trouble getting yarn thin enough, you'll either need to spin thinner singles, or take some singles out of the ply. I have some other tips on how to get more (or less) out of plied yarn here: http://askthebellwether.blogspot.com/2008/04/how-do-i-spin-thicker-plied-yarns.html 

You use a McMorran Yarn Balance (or the new Yarn Yardage Tool from www.eugenetextilecenter.com ) (and there is a DIY one on www.spinningdaily.com )That will give you the yards per pound, to compare to the commercial yarn. If the grist is too many yards per pound, your sweater would be lighter than one from the commercial yarn -- it also likely will not be as drapey, something to keep in mind for a Kimono Swing Sweater but less important for a waist-hugging ribbed fitted sweater.  To get the grist lower, a more worsted style of spinning, pinching as you draft, helps make the yarn denser at the same wraps per inch. 

If the grist is too few yards per pound, your sweater would be heavier than one from the commercial yarn -- this could cause stretching of the sweater from its own weight, especially with inelastic fibers like silk and alpaca. To get the grist higher, a more woolen style of spinning, allowing more air in the yarn, helps make the yarn less dense. Another thing to examine is the fiber content -- if it has wool,  perhaps a crimpier wool, or if it is a blend, a larger percentage of wool in the blend will help get more air in the yarn.

Whew! Once you have grist close, it's time to knit a gauge swatch. Remember, we don't want to have to rethink the shaping, so row gauge is as important as stitch gauge. Altering your needle size up or down from the recommended size can help adjust row gauge without overly impacting stitch gauge. Remember that finishing the swatch is an important step here -- it lets the knit stitches wriggle as they can a little so your final fabric is more consistent.

If your row gauge is too low, you may  find a thicker yarn at the same grist helps get you to row gauge. To keep grist the same and increase yarn thickness:

  • use crimpier wool
  • use a woolen prep -- carded batt or rolags
  • don't use commercial wool top, as it is so compressed that it tends to result in more compressed yarns (be sure to wet-finish the yarn before meassuring its grist, so the top can open  up in the finishing)
  • use more of your less dense fibers: fine wool, angora, cashmere
  • use less of your dense fibers: alpaca, llama,  long wools, mohair, silk, rayons
  • use less twist in the singles (so plying also uses less twist, letting the singles be puffier in the final yarn; this is even true in cabled yarns).
  • use a more woolen spinning technique

If your row gauge is too high, you may find a thinner yarn at the same grist or a 2-ply helps reduce it. To keep the same grist and decrease yarn thickness:

  • use less crimpy wool
  • use a worsted prep, or if drum carding, keep all fibers aligned for smooth batts
  • don't use roving, as it randomizes the fibers and keeps air in the yarn unless spun to a very high twist
  • use less of your less dense fibers
  • use more of your more dense fibers
  • use more twist in the singles (and thus have a higher twist final yarn)
  • use a more worsted spinning technique

Whew!  If you can work through all of that, then next you need to figure out how much fiber to start with. The pattern will give you the number  of balls; and should provide the ball weight -- if not, the yarn manufacturer's website, the ravelry.com yarn database or the yarn library on yarndex.com.

number of balls * ball weight = total weight of fiber

If the yarn was a blend, or your sampling led to blending, then you need to use your final percentages rather than the ball band's.

So, a sweater calling for a pound of a 50/50 wool/alpaca blend means I would want to have about 9 ouunces each of wool and alpaca.  It would be hard to buy all the fiber up front correctly since you don't know if the blend will spin to the same grist for you, or if you might adjust it. If you had to get it all up front, then I'd recommend that you get about 25% extra of each fiber to have room to make adjustments. And, have some "adjusting fiber" ready in your stash so you can adjust grist if needed.

You can stop spinning when you have the yardage the pattern calls for. Again, look at the number of balls the pattern calls for, and this time, the yards per ball:

number of balls * ball yardage = total yardage

Most patterns, especially if they use multiple colors, will have excess yarn, which means if you spin to that yardage, you will also have some wiggle room.

If you can get your hands on a sample of the yarn the pattern uses then you can see its number of plies, how tightly or loosely it’s spun, and possibly even knit a gauge swatch to see drape and hand of the yarn … All useful if you plan to mimic it.

I prefer to mimic drape, so the garment behaves like it would if the commercial yarn had been used. If you get more ypp in your handspun than the commercial yarn has, your item will be more drapey -- that may be good, or it may be too floppy. If you get fewer ypp, then yours is denser yarn, and your knit item is likely to be stiffer and heavier.

Also, if your ypp is less than the commercial yarn, you will need more fiber by weight than the commercial yarn’s total weight.

Sampling and swatching is important when using handspun. Knitty had a good piece on yarn substitutions in general, with commercial yarns, which also applies here: http://www.knitty.com/ISSUEwinter03/FEATwin03TBP.html

I enjoy using my handspun yarn for many handcrafts: knitting, weaving, crochet, Nalbinding, and even embroidery. With an understanding of fiber and grist, I can substitute yarns with great results. Here is an early substitution, handspun 2-ply used to make Fiber Trend's felted clogs pattern (pre-felting):

If you'd rather work things the opposite direction: spin first, then pick what to use the yarn in, see my post on choosing knitting patterns to match handspun yarn: http://askthebellwether.blogspot.com/2008/12/what-size-needle-do-i-knit-my-handspun.html 

~~~~
© November 1, 2013 by Ask The Bellwether, posted at http://askthebellwether.com/

How do you tackle a big project?

By Amelia © September 12, 2013

This county fair project of mine is what you call a "big project". Not quite as simple as making a sweater ... then I'd find wool, spin it, and use the pattern to knit it up. Done. "Small matter of time" ... Which is why I don't have a handspun sweater. My life is lived in smaller-than-a-sweater chunks.

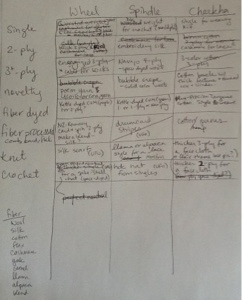
I have a clear goal, 24 finished fair entries. 18 of them are skeins, 6 are finished items. Three different spinning tools (wheel, spindle, charkha). Fiber processing (tool of my choice), dyeing fiber (method of my choice, just has to be done before spinning).

Figuring it didn't really matter where I started, I looked at what I had on my wheel and spindle already. Got that Turkish spindle project done (you saw it already), with the great addition that I had carded the fiber for it, to boot! There was a sock project on my wheel, which has some fiber processing in it, though since it's only one of the three plies, I may do a different one for that lot and  use this one for 3-ply on a wheel. But that is yet to come.

See that little diversion? That's what happens when I start planning... distraction. I find it's easiest to think and plan with marker-on-whiteboard or pen-on-paper.

As you can see, I like charts. The 8 yarns and 3 spinning tools lend themselves nicely to a chart. Making a list of fibers helped me build some variety in my chart. The fair doesn't award fibers differently, but the judge will recognize when harder fibers are selected, and grade accordingly. That's a discussion yet to come ... What helps your entry stand out, or How is your entry judged.

This gives me a roadmap ... I marked off the three I have done (yay! small party!) and noted those I have already started. I found two kinds of project totes in my studio ... Apparently I like to sample spin quite a bit, as spindles with tufts of wool fill quite a few bags. There needs to be a good sample-wrap-up session in that studio of mine. But there were several spindle projects started, an unfinished crochet hat, and a silk scarf I began recently that lend themselves to fair entries.

I am collecting fiber to spin and finished entries in a tote so I can stay on task. The nice thing about this project is I can change an entry if something different strikes my fancy. I may also want to "beef up" an entry by going for something more difficult than what I plan. So there is flexibility built-in as well.

The next step in planning is time management. I can't guarantee each project is doable in two weeks or less, even with materials on hand. The skeins are all reasonable, but the knitting and crochet, especially if I need to spin the yarn (nothing suitable in my handspun stash), will take longer. I'm not a particularly speedy knitter. I've picked projects that are fairly small. None will win me best of show, but that's a goal for another year.

To help get things done on time, then, I need to start the knit and crochet projects soon, and if I can use existing skeins, even better. Time to round up the handspun stash and hold auditions ... I think a few favorite skeins are about to graduate to UFO status. I don't know about you, but particularly favorite fibers and skeins tend to stay in skein for a while before they absorb their potential and become favorite hats, socks, or scarves.

After that, I need to round up the fibers on my chart and then make steady progress. I'm more likely to succeed if I spend an hour or two a day than if I say Tuesdays are Fair days. That's about knowing myself ... How do you work best? A little every day, or a few dedicated days a month? Know yourself, and set aside time accordingly.

If there was a clear order, I would need to identify it and make progress in that order. But for this, it doesn't really matter where I go on my chart ... I could finish the charkha column first, or move between spinning tools each time; all of the projects appeal to me, so most likely I will keep it semi-random. Other ways to make it random would be to roll dice to pick row and column, alphabetize the entries, or pick them out of a hat.

One thing my chart doesn't show is that I need to prepare the entries for the fair. That's a fair amount (oooh, a pun!) of paperwork and reskeining. So I ought to plan on a week or two to get the entries fair-ready, if I don't do that as I go along. It is best to wait, as a skein that sits can get a bit compressed and mussed. Okay, so noted: coordinated wrap-up can be just as important as planning.

So, there you have it:
1. Plan
2. Prioritize
3. Schedule
4. Accomplish
5. Finalize
6. Enjoy the Fair!

~~~~
© September 12, 2013 by Ask The Bellwether, posted at http://askthebellwether.com/blog

Five Tips For Spinning a Consistent Yarn

full bobbin!By Amelia © February 25, 2011

Wow! Madrona Fiber Arts Festival was a hoot! But more on that at the end...

Last summer, I was contacted by a tapestry weaver about spinning some "3 ply yarn" for her. In fact, the yarn she wanted mimiced in handspun was Paternayan's, which has 3 strands or fingering-weight 2-ply loosely twisted together. And, her plan was to separate them to color-blend (tapestry weaving is so cool!)

There was to be 10 pounds of fiber to be spun, from local sheep, locally dyed and milled at Taylored Fibers. 10 pounds. That didn't quite hit home until I (a) injured my foot in July, leaving me only e-spinning as a wheel choice and (b) got a temp job 4 days a week in September, which is still steaming along with a somewhat indefinite future.

Now, this 10 pounds isn't like the normal production run you might do for a sweater: not all the same color, to be spun up and bobbin-swapped as needed to make the singles come out consistently. Not at all. This is 8 ounces of each color -- and we decided to do them 4 ounces at a time, so she would have each color as quickly as possible, with the second half coming later.

So, I have to spin 4 ounces, ply it, repeat until done. How can it hope to remain consistent?

Here are my tips:

1. Keep your sample card handy. Mine has actual Paternayan's (the source yarn to base everything on!) wound around it to see the twist angle in the ply, split into its singles and wound around it to see the diameter of the single, and fluffed out to see the fiber in the single.

Every time I start a new color, and at random points as I spin that color, I compare back to that source yarn. At least once per ounce during the singles, and at the start of plying to make sure I have my rhythm right.

2. Focus. I don't drift off into conversations -- this fiber doesn't come with me to spin-ins, though the plying might, it's not as hard to get right. All spun at home. I've lost the thread of Stargate Atlantis entirely since I am paying more attention to the yarn than to the plot.

3. Use the same speed and tension each time. On my e-spinner, I set the dial the same; on my treadle wheel, I use the same ratio. And, I always back the brake band's tension off to soft-as-will-draw-on as I start each bobbin, since as the bobbin fills, the brake tension gets tightened bit-by-bit. Forget that, and the fiber yanks onto the flyer faster than I can say "boo!"

4. Use the same spinning style each time. If you start out spinning worsted, spin it all worsted. If you start out spinning with double-drafting, spin it all that way. Whichever method you pick, stick with it. This yarn, I spin with double-drafting. It's production spinning, and that's my fastest way to get the yardage on the wheel.

For plying, I have been using The Gentle Art of Plying as my plying method, but recently re-learned Alden Amos' plying method (see my youTube video embedded here; it is described in his Big Book of Handspinning).


Amos' plying method is continuous, always moving toward the wheel, which was gentler on my e-spinner and let it spin for longer before heating up the motor. I could do the whole 4-plus ounces in one sitting. It takes me about an hour to ply 4 ounces (400 yards) at 1200 rpm, close to top speed, on my e-spinner. [ For the techs out there .. that works out to 5 twists per inch. About right, for the ply twist for this yarn. ]

5. Measure and adjust. Not only do I work to stay on-task during the four ounces, but once it's done, I skein it up with a yardage meter (since I'm paid by the yard, it does double-duty). That tells me if I stayed in the target range. I should get about 100 yards an ounce. If it's too short, then it was too thick or too dense (spinning style - worsted is denser than woolen, or too much twist compacting it). If it's too long, then it was too thin or too airy (not enough twist will pouf out more in the plying). I make a note of the ones noticeably outside the target (over 10% off), and let the weaver know if a color might be a little thinner or thicker than the others, so she can compensate in the weaving.

More than anything else, that sample card and staying on-task keep the yarn within bounds. The medium wool that I'm spinning -- some Border Leicester, some Jacob, some Romney -- all feels about the same, and all will spin into a slightly finer yarn than my target if my goal were fine spinning.

Now, if all your fiber is the same color, you can spin a whole bunch of bobbins-full of singles, and then randomly pick from the singles to ply. That way, you can ply early singles by later singles or totally randomize, so your yarn diameter varies either as little as possible, or as randomly as possible. But I didn't have that option in this spinning journey. If you want to hear about spinning for a sweater's worth of fiber, Amy King has a great article on Knitty, Spin me a sweater!

the latest tapestry yarnI just sent off the most recent 2 pounds to the tapestry weaver, shown here, bringing the total to 6 pounds, and got 2 more pounds to spin. All in all, it will be about a full year's journey to complete the 10 pounds. I have all sorts of luscious fibers lined up to treat myself with when my hands want a break from the medium wool. Pygora, Alpaca, Silk, and my own precious Llama -- all for laceweight. I'm thinking, though, I might want to dive into the stash for some wool/silk blend to spin into a thick single and tame with rough finishing, for a total change of pace. Or not -- 4-ply sock yarns are also on my spinning want-to's.

~~~~

So, how fun was Madrona? Wow. Franklin Habit's class on photography was eye-opening. I had a terrific time teaching a dozen or so folks the basics of spindling in the rotunda, did some stash enhancement to my silk weaving yarn at the Habu Textiles booth, picked up some lovely pencil roving from Crown Mountain Farms for learn to spin kits, and got to catch up with a variety of friends from hither and yon, including meeting several face to face for the first time. Syne, Sarah, Tasha, Anne-Marie, and many others -- however fleeting our hello's may have been, I always treasure meeting friends. And new friends, too -- Taryn, John, Selah, Judith W - how cool to meet you!

If you didn't get to take one of my classes, there are e-books for all three of them on my website; Spinning Self-Striping Socks and the Mitts of Experience has always been fun to teach (see the review by kayak on ravelry for some hints why), and I'm pleased to announce two brand-new e-books for the other two classes, Power Spinning and the All That Yarn Scarf, and Silk on Spindles and the Lacey Vertical Rib Scarf. I hope you enjoy them!

If you'd like to be on an email list for email announcements of upcoming workshops, let me know -- there are some fun ones coming up in March with Sheep & Socks as the theme.

~~~~
I ran across a great quote on You, Simplified worth repeating:

Absorb what is useful, discard what is useless, and add what is uniquely your own ~Bruce Lee.

How cool is that. Exactly. I hope you, dear reader, use my blog exactly that way: learn the useful, forget the useless, and add your own ideas into the mix.

~~~~
© February 25, 2011 by Ask The Bellwether, posted at http://askthebellwether.com/blog

How can I do Sock Machine Selvedges?

compound cyl socksBy Amelia © May 27, 2010

A question from a reader of this blog ...

My question is: I have recently purchased a Legare 47 and need to know if it is only possible to make a selvedge "cast-on" at top of sock in 1 x 1 rib, or can it be done with 3 x 1 or others? For me it has only worked using the 72 cylinder and doing 1 x 1 rib. Won't work with 54 cylinder. Any ideas?

Thanks for asking ... it's nice to do a sock machine post, as I was recently knitting on mine and even playing with selvedges. I'm going to assume you have a 72-slot cylinder, a 54-slot cylinder, and a 36-slot ribber. This gives you a few options...

First one ... if you want to do a 3/1 top edge, you could put a needle in every cylinder slot, without the ribber on yet, and use an e-wrap to make a selvedge. You wrap every needle from where you would start to knit with an "e" of the yarn you plan to knit with (pull along tail through so you can get all the way around with it), counterclockwise around the cylinder, in the same order the needles will knit. Then, knit one row. This makes a selvedge that won't unravel. At this point you can put the ribber in and transfer stitches from cylinder needles (removing them!!) and onto ribber needles as you like.

I admit, this selvedge is fiddly -- the number of times I have dropped a stitch in that first ribber row, I hesitate to count. I've been very pleased in the reliability of my NZAK to not drop ribber stitches, so I can use this selvedge when I want to. It has the virtue of working no matter what ribbing I want -- 3/1, 2/1, 1/1, or mock rib.

Second one ... a mock rib hemmed selvedge. For this, you leave out every n-th needle. For a 3/1 mock rib, it's every 4th needle. And, you just start knitting with your real yarn once you have your waste yarn knitting cleanly. Once you have 10-40 rows (how many defines the depth of your hemmed top), you pick up the first knit row's stitches and put them around the needles with the current row, so the first row is knit into the next round of knitting.

Third one ... there's a great selvedge you can do with a 36-slot ribber and 54-slot cylinder. If you use only every other slot in the ribber, you can set up for a 2/1 ribbing. Once this knits cleanly with the waste yarn, attach your sock yarn and continue like so:
  1. Knit one row with the sock yarn.
  2. Lift the first cylinder needle of each pair all the way around (well, as around as you can ... just be sure to continue with this step as you start the next one...).
  3. Knit two complete rows with that first-of-each-pair needle not knitting. Yes, this puts a bar of yarn in front of it each time.
  4. Now lower the out-of-work needles, carefully, so their latches are open and above the bars, and knit the next round.
Whew! This is actually a fairly easy selvedge, and my favorite for 52-cylinder socks and mittens.

You mentioned the 1/1 ribbing; you could, if you want a 3/1 sock on the 72, use 1/1 ribbing just for 3-4 rows and then convert over to 3/1 ribbing for the rest of the leg.

There have been other selvedges I've played with -- e-wrap on cylinder needles, then starting ribbing needles by picking up the bar from the row below (not easy!); and a variety of sewn selvedges after taking the sock off the machine -- but I'm going to guess you're looking for a cranked selvedge, not a hand-done selvedge. So go ahead, experiment -- try out a variety of selvedges, knit short tubes, and see if they hold or let stitches run.

I've been happiest with 1/1, 2/1, and mock rib hemmed-top socks, all of them pretty deep -- I'll do 25 rows of ribbing, and 40 rows before hanging the hem of a mock rib. I used to only do 5-10 rows, but it doesn't make a deep enough ribbing to hold the sock up well. 3/1 topped socks haven't stayed up that well for me, so I don't tend to use it at the top edge of a sock.

The socks up at the top have a 1/1 top, 3/1 leg and foot; they are tiny ... knit on my NZAK's compound cylinder :-).

~~~~

Related posts:
Sock machines: hem or ribbed top?
Sock machines: How do you put a selvedge on a 3/1 sock?
Sock Machines: Can you use a 36-slot ribber with a 54-slot cylinder?

~~~~

© May 27, 2010 by Ask The Bellwether, posted at http://askthebellwether.com/blog

How do I choose a speed setting on my e-spinner?

HansenCrafts miniSpinner with 5.5 oz handspunBy Amelia © April 20, 2010

The explosion of interest in e-spinning, sparked in part by the cute-and-amazing Hansen miniSpinner, is generating many interesting conversations over on Ravelry, on the electric spinners group and the recently formed HansenCrafts MiniSpinner group.

I've been contemplating for a while how you would approach explaining electric spinners and their use, both to non-spinners learning to spin on one, and to wheel spinners who have their built-in rhythm of treadle and draft. So, here are some thoughts on the topic of choosing a speed setting on your e-spinner.

I like to think of the speed dial on the e-spinner (and all the ones I've spun on -- Fricke, Ashford, Butterfly, and Hansen) as a clockface. Your particular maker's e-spinner may turn through the whole face, may only turn from 7 o'clock to 5 o'clock, or may have an even shorter "range" on its clock face -- so be sure to consult any documentation that came with it, and don't push the knob further than it is capable of going. My "times" here will refer to the Hansen miniSpinner -- you may find some variation in your own.

So, let's say you're spinning along, and stop to check out your yarn.

If there’s not enough twist in your singles, then increase the speed; that’s the fastest (no pun intended!) way to get more twist in them. Another thing that can help is minimizing the scotch tension -- I usually set mine so that any less would have me at no draw-in at all. That lets you hang on to the single a little longer before it is drawn onto the bobbin, so more twist can get in your yarn. I did a post about testing singles for underspun-ness a while back, if it’s helpful to add more, it’s here. The third alternative is to hold on to your new yarn for a beat or two before allowing it to be drawn onto the bobbin -- this adds more twist, as you aren't drafting, and twist is still going in to the yarn.

If there's too much twist in your singles, then decrease the speed. This will put twist in more slowly. You can also increase the scotch tension, so the bobbin pulls the yarn onto it more aggressively. If you are a relatively new spinner, it is likely that you are not drafting very quickly. Over time, you will find your drafting speed increases, and the amount of twist in them decreasing -- refer to the previous paragraph on how to handle that.

A great book about controlling twist is Judith MacKenzie McCuin’s The Intentional Spinner -- she covers a wide range of manual wheel information for speed control. What she says about scotch tension we can carry through unchanged. But where she talks about pulleys and changing ratios, we can adjust our engine’s speed. If JMM tells me to use a smaller pulley/higher ratio, I will move my dial clockwise a bit more. If JMM tells me to use a larger pulley/lower ratio, I will move my dial counter-clockwise a bit more.

I usually adjust my Hansen miniSpinner speed dial “by the hour”. I use 9:00 for low twist fat singles, 12:00 for moderate twist “default” singles, and 3:00 for high twist cobweb (very, very fine) singles. I’ll use 10, 11, 1, and 2 for points in-between, and may make finer adjustments to suit my drafting speed at that moment. Now, that’s me, and every spinner has their own pace -- so your settings may vary. Also, I know the Woolee Winder has more drag than the hook/slider flyers, so models of the same e-spinner with hook/slider flyers have a higher top speed than the Woolee Winder models.

I usually adjust my scotch tension brake “by the minute”, that is, I make very small adjustments to it to increase or decrease tension -- a tiny little nudge on it can make a huge difference when I’m trying to get down to that almost-nil draw-in, and only a tiny nudge is needed, typically, to maintain draw-in once the bobbin is 3/4 full.

~~~~

3 ply CVMAnd, a few months in, how am I enjoying my miniSpinner? Quite a bit! It's helped me increase my treadling speed, I can ply super-duper quick, and I've finally created the perfect (for me!) 3-ply sock yarn. And did I mention that it's quiet? Lovely for spinning in the evenings during the family chat in the sitting room. Next up: the perfect 4-ply sock yarn :-) and a whole bunch of laceweight pygora, since the first 6 ounces was a total blast!

The singles on the bobbin in the opening shot were part of a skein I sent to Humanity Handspun -- and it sold :-) I'm a huge fan of what Tina's doing with HH, raising money for a good cause and supporting fiber artists at the same time. So you're likely to see more of my yarn in their online store in the near future.

~~~~

© April 20, 2010 by Ask The Bellwether, posted at http://askthebellwether.com/blog